Tip
Definitive Guide To Re-Tipping
I’m not trying to teach your granny how to suck eggs here, but I am saying maybe you should take the eggs away from granny and think about putting her in a home…
Re-tipping is a basic job you should do yourself but, judging by the countless cues that come through the workshop, it is usually done poorly.
So, learn to re-tip properly. Watch the video and animation below. See how to re-tip any cue, BlackSpin or plain brass, with no risk of damage to the ferrule.
Even if you have re-tipped many cues, I advise you to watch it and take advantage of some very useful tips on how to do it properly. Clearly that is not the case with some of you judging by the terrible condition of the many brass ferrule cues that I get in for repair. Tut tut…
And here’s a nice little animated version with an ‘enthusiastic’ soundtrack to build up your confidence…
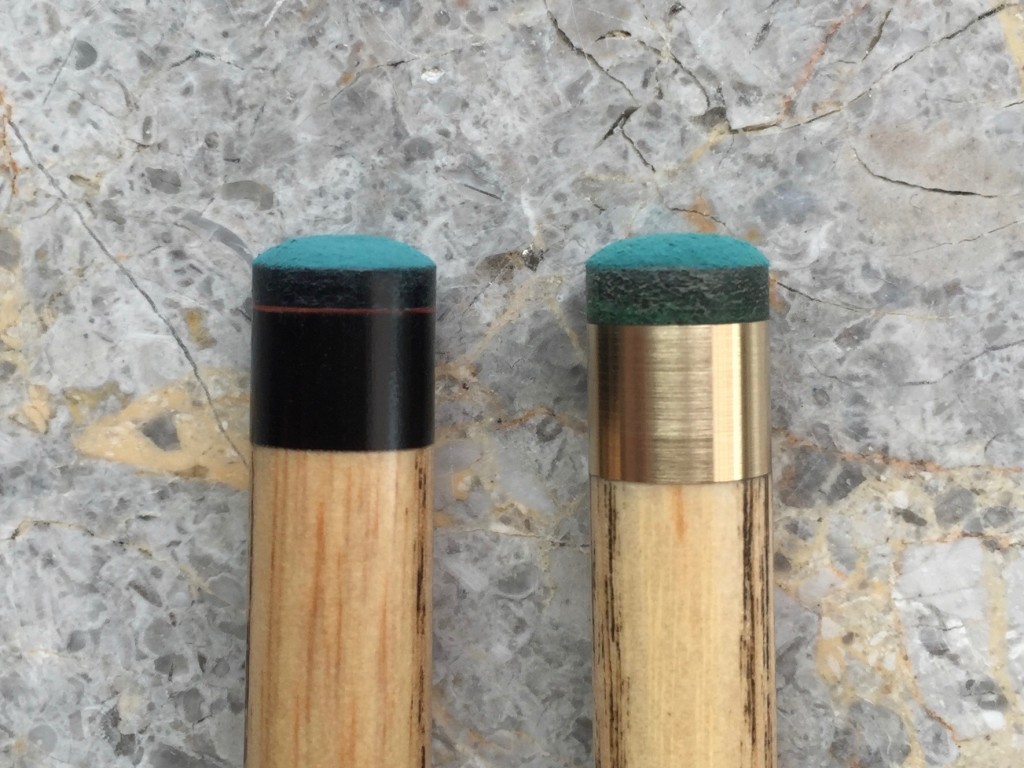
IMPORTANT – BlackSpin Ferrules!
- DO NOT attempt to re-tip any BlackSpin ferrule cue before you have watched the video because tips stick to BlackSpin ferrule material extremely well, and extra care should be taken when removing them in preparation for a new tip.
- Note – It is highly recommended that you use a fibre tip pad when sticking tips to BlackSpin ferrules.
Tip Pads
Protect the ferrule and help prevent damage
Why?
Tip pads helps protect your ferrule from damage during use and when you replace your tip because they can be easily seen and removed. Unlike stubborn bits of leather which can be difficult to get off without digging into the ferrule surface.
- Brass (or other metal) ferrules – It is not essential but a good addition nevertheless
- BlackSpin ferrules – You can fit any type of tip but it is highly recommended that you use a tip pad to prevent possible damage to the ferrule. Here’s why:
1) During use, a tip compresses and tends to spread out over time. With a brass or other metal ferrule this does not matter as the tip ‘creeps’ outwards from the ferrule. But because tips stick extremely well to BlackSpin ferrule material, this may strain the composite fibres of the ferrule top.
So, if you regularly hit hard on one part of the tip e.g. power screw shots, the tip is constantly trying to ‘drag’ the ferrule top in that one place as it compresses and spreads out. Particularly on smaller ferrules where there is not so much material, there is the potential for this to cause the material to ‘break out’ at that point.
2) If you fit a BlackSpin tip, or any other black or very dark tip, to a BlackSpin ferrule, it can be very difficult to see where the tip ends and the ferrule starts. But using a different colour tip pad helps to see when the tip needs changing, i.e. if the tip is almost down to the pad, it is time to change tips. This prevents the danger of playing on the ferrule material itself which is guaranteed to cause damage.
An added advantage is that the tip pad is much easier to remove cleanly from the top of the ferrule, so there is also much less chance of damaging or mis-shaping the ferrule as you clumsily try to tear the old tip off with that blunt blade you’ve been using…
So, whilst BlackSpin ferrules need extra care when re-tipping regardless, the use of a tip pad will help avoid unnecessary damage.
How To Install A Tip Pad
1) Use cyanoacrylate glue (superglue) – Any superglue is fine but preferably use gel or thick type because it is easier to control.
2) There is no need to sand the pad but lightly dampen the pad first by wetting your fingertip and touching it on the pad. Then blow on it so it is not ‘wet’ to look at. Moisture helps to cure superglue and also ensures there is no dust/dirt on the pad to cause problems with adhesion.
3) Lightly sand the back of the tip to ensure it is dead flat and clean, then dampen the tip base using the same method used in step 2 above.
4) Put the tip pad on a flat surface with a spot of superglue in the middle of the pad.
5) Carefully position the tip centrally on top of the pad and press down with finger pressure for a few seconds. Use enough superglue so that a little comes out all round the sides of the tip to be sure the whole tip is stuck. Do not use too much glue so that it drips over the side of the pad or you may stick it the surface you are working on. Your wife/mother’s favourite table probably…
6) Once stuck, use scissors to trim around the tip. The top edge of the scissors should run against the wall of the tip so it’s easy to guide it round and trim the excess pad off in just a few seconds, leaving the tip pad almost exactly the same size as the tip.
7) Don’t worry if you’re a little bit out here and there, you only need to be close enough so that you can clearly see you are positioning the tip correctly on the ferrule. But if you leave too much on, you may misjudge and stick the tip off to the side slightly, so try to trim it nice and close.
8) Lightly sand the the base of the now padded tip to ensure it is dead flat and clean.
9) If you wish to stick the tip to your ferrule using superglue, dampen the pad again using the same technique described in step 2 above. If you wish to use epoxy or contact adhesive, do not wet the tip.
Final Word
Learn to re-tip properly!
Even if you think you know what you’re doing, swallow your pride and watch the video and animation.
Pay attention and you’ll be re-tipping like a professional, and not damaging the ferrule in the process…
